Making Temporary Preparations of Cellular Material for Light Microscopy
🌱 Purpose of Temporary Preparations
- To observe cells or tissues under a light microscope for study of structure and function.
- Temporary slides allow quick examination without permanent mounting.
🧩 Materials Needed
- Microscope slides and cover slips
- Dropper or pipette
- Staining solutions (e.g., iodine, methylene blue)
- Distilled water
- Forceps and scalpel or razor blade
- Paper towels or blotting paper
🧬 Step-by-Step Procedure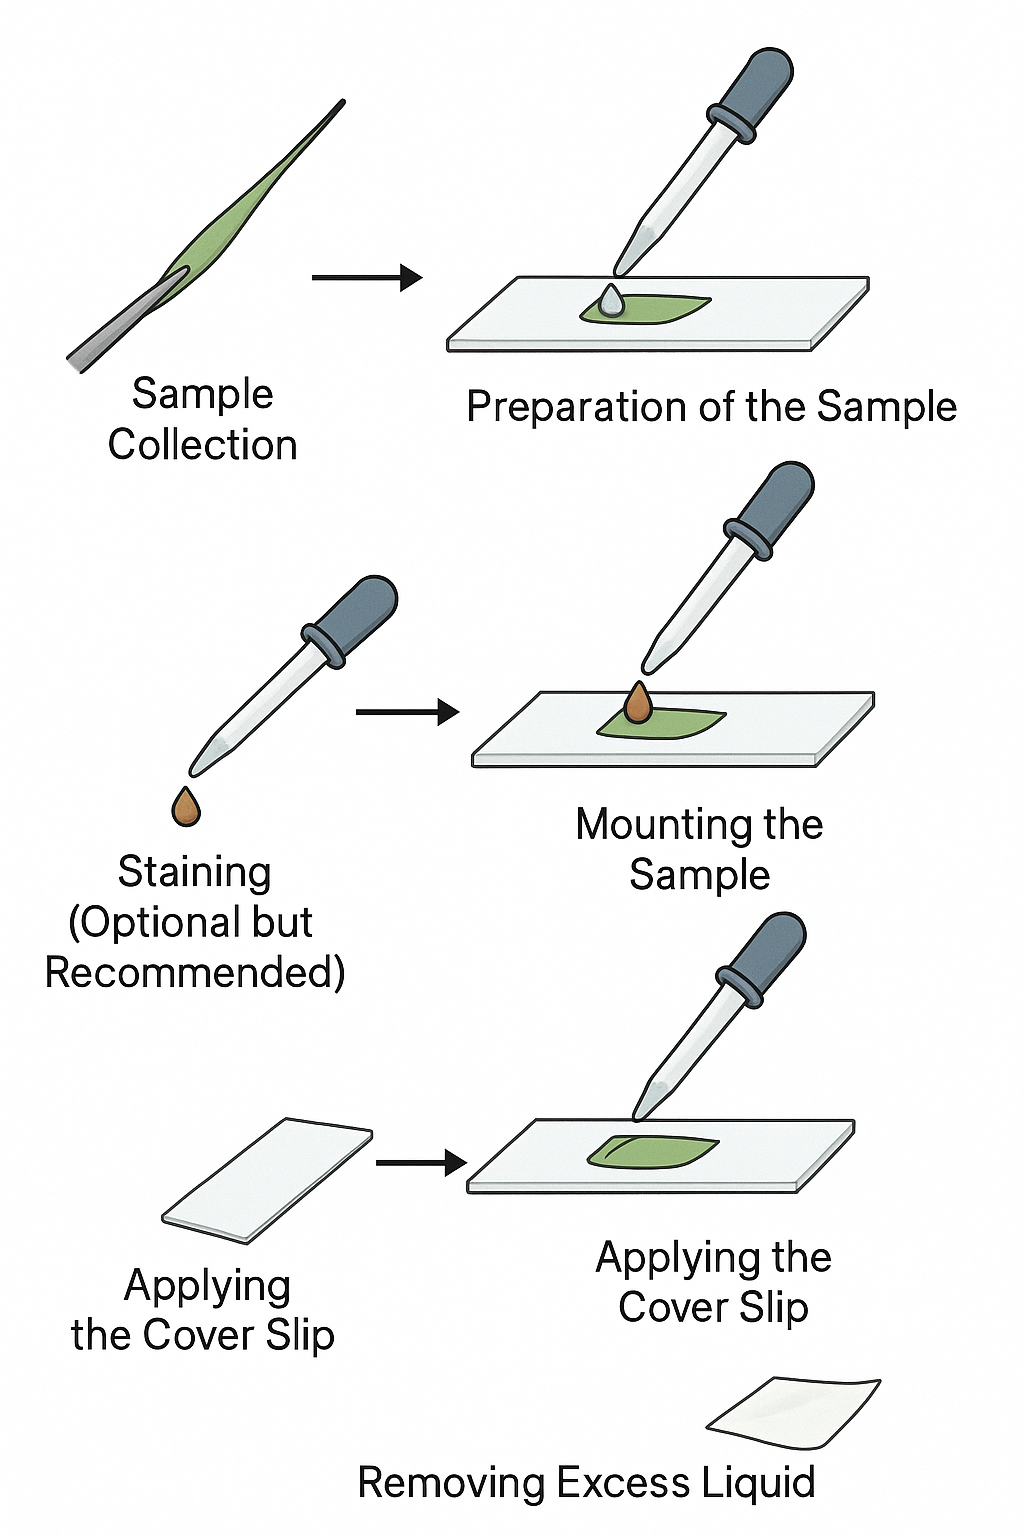
Sample Collection
- Select fresh cellular material (e.g., onion epidermis, cheek cells, leaf peel).
Preparation of the Sample
- For solid samples (onion epidermis, leaf peel): Use forceps to peel a thin layer or scrape a small section.
- For liquid samples (blood, pond water): Use a dropper to place a small drop on the slide.
Mounting the Sample
- Place the sample flat on a clean glass slide.
- Add a drop of distilled water or stain (if required) onto the sample to increase visibility.
Staining (Optional but Recommended)
- Add a drop of stain like iodine (for plant cells) or methylene blue (for animal cells) to highlight structures such as the nucleus or cell wall.
- Wait 1-2 minutes for stain to act.
Applying the Cover Slip
- Hold the cover slip at an angle (about 45°) next to the sample.
- Slowly lower it to avoid air bubbles.
Removing Excess Liquid
- Use blotting paper or tissue to gently absorb excess liquid around the edges.
🧪 Tips for Clear Viewing
- Avoid thick samples; thin layers allow light to pass through.
- Minimise air bubbles under the cover slip.
- Use appropriate stains to improve contrast.
- Start viewing under low power, then switch to high power for details.
📊 Summary Table of Steps
| Step | Description | Notes |
|---|---|---|
| Sample Collection | Choose fresh tissue or cells | Onion epidermis, cheek cells, etc. |
| Sample Prep | Thin layer or drop on slide | Use forceps or pipette |
| Mounting | Place sample + drop of water/stain | Ensures visibility |
| Staining | Add stain for contrast | Iodine for plants, methylene blue for animals |
| Cover Slip | Lower gently to avoid bubbles | 45° angle recommended |
| Excess Liquid | Blot around edges | Prevents slide slipping |
Temporary slides are easy and fast but not durable for long-term storage.
Staining is crucial to see internal structures clearly.
Handle slides carefully to avoid breakage or contamination.
How to Draw Cells from Microscope Slides and Photomicrographs
🌱 Purpose
- To create clear, accurate scientific drawings of cells observed under a microscope or from photomicrographs (microscope photographs).
- Helps in studying and documenting cell structure.
🧬 Materials Needed
- Microscope slide or photomicrograph
- Pencil and sharpener
- Eraser
- Ruler (for scale lines)
- White drawing paper or notebook
- Colored pencils (optional for shading)
✍️ Step-by-Step Guide to Drawing Cells
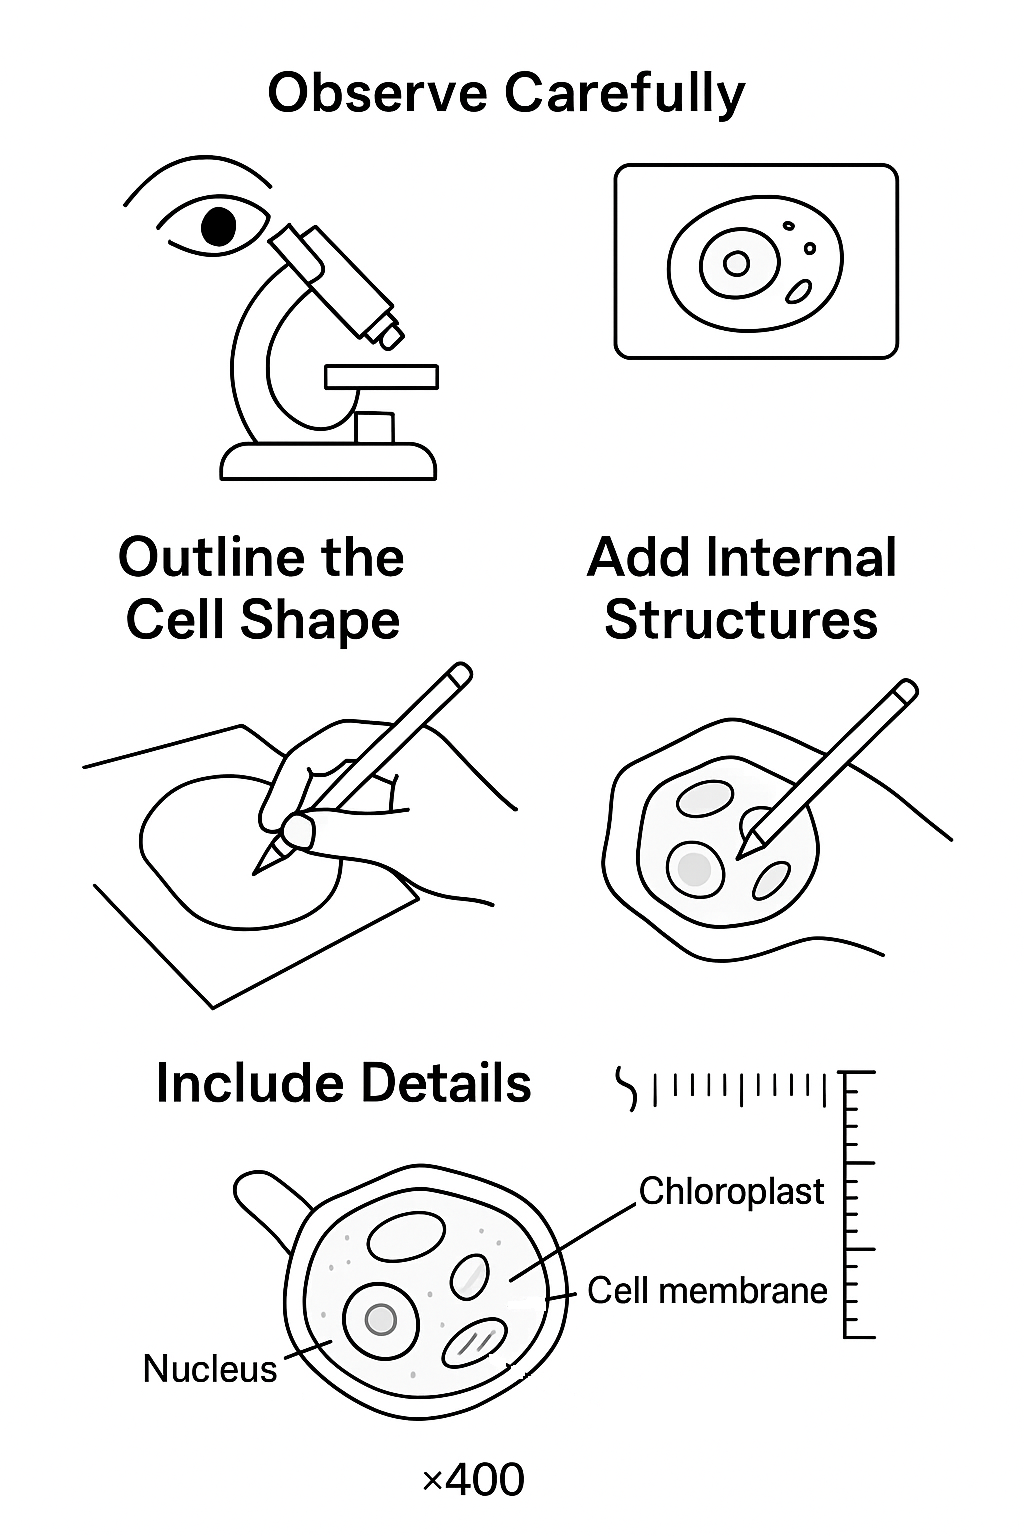
Observe Carefully
- Look closely at the microscope slide or photomicrograph.
- Identify key structures like the cell membrane, nucleus, cytoplasm, organelles, etc.
Outline the Cell Shape
- Draw the overall shape of the cell lightly using a pencil.
- Keep proportions similar to what you see.
Add Internal Structures
- Sketch important organelles (nucleus, vacuole, chloroplasts, etc.) inside the cell outline.
- Use simple shapes and maintain relative size and position.
Include Details
- Add details like cell wall (if plant cell), granules, or cilia as visible.
- Avoid overcrowding; keep the drawing neat and clear.
Label Key Parts
- Use straight lines or arrows to point from the structure to its name.
- Write labels clearly outside the drawing.
Draw a Scale Bar
- If scale is given (e.g., 10 µm), draw a scale bar to indicate actual size.
- Use a ruler to make the scale bar proportional.
Use Appropriate Magnification
- Mention the magnification used (e.g., ×400) near the drawing.
📊 Checklist for Scientific Cell Drawing
| Step | Action | Important Notes |
|---|---|---|
| Observation | Identify visible features | Focus on clearly seen organelles |
| Outline | Light sketch of cell shape | Maintain correct proportions |
| Internal Details | Draw organelles and structures | Keep shapes simple and accurate |
| Labeling | Add labels with straight lines | Write clearly outside drawing |
| Scale Bar | Draw scale bar with ruler | Indicate actual cell size |
| Magnification | Write magnification used | Helps understand drawing scale |
Accuracy and clarity are more important than artistic skill.
Scientific drawings are a communication tool, so neatness and correct labeling matter most.
Practice observing and sketching improves your understanding of cell structures.
Using an Eyepiece Graticule and Stage Micrometer to Make Measurements
🌱 What Are They?
- Eyepiece Graticule: A small transparent scale fitted inside the microscope eyepiece. It has arbitrary divisions (usually 100 units) but no fixed measurement until calibrated.
- Stage Micrometer: A slide with an accurately known scale (usually 1 mm divided into 100 divisions, so each division = 0.01 mm or 10 µm). Used to calibrate the eyepiece graticule.
🧬 Why Calibration Is Needed?
- The eyepiece graticule divisions do not have a fixed size.
- Calibration links the eyepiece scale units to actual lengths (µm or mm) for a specific magnification.
🔍 Step-by-Step Calibration & Measurement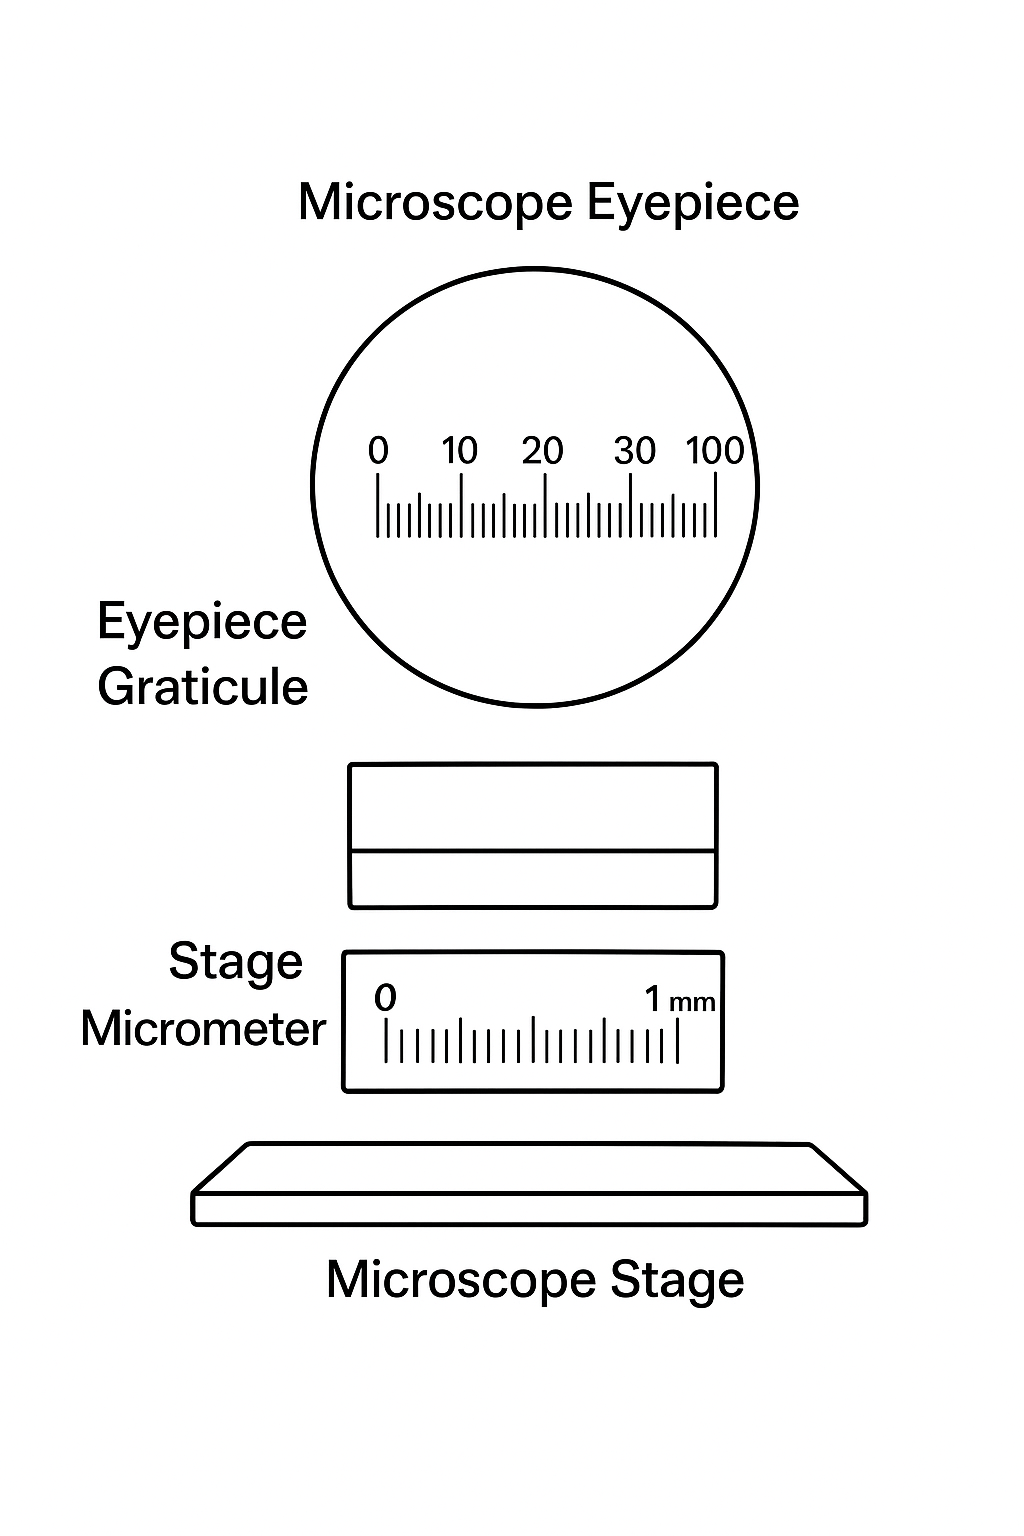
- Place the Stage Micrometer on the Microscope Stage
Focus on the scale marked on the micrometer slide. - Align the Eyepiece Graticule with the Stage Micrometer Scale
Look through the eyepiece and observe both scales superimposed. - Count How Many Eyepiece Divisions Match a Known Length on the Stage Micrometer
For example, 50 eyepiece units might equal 0.5 mm on the stage micrometer. - Calculate the Value of One Eyepiece Division (EPU)
Size of 1 EPU = Length on stage micrometer ÷ Number of eyepiece divisions
Using the example:
Size of 1 EPU = 0.5 mm ÷ 50 = 0.01 mm = 10 µm - Use the Calibrated EPU to Measure Specimens
Count how many eyepiece units span the specimen.
Multiply by the size of one EPU to get the specimen size.
🧮 Example: Measuring a Cell
Suppose a cell spans 30 eyepiece units.
From calibration, 1 EPU = 10 µm.
Actual cell size = 30 × 10 µm = 300 µm.
🧪 Unit Conversions
| Unit | Equivalent | Use for |
|---|---|---|
| 1 millimeter (mm) | 1,000 micrometers (µm) | Visible cell size or tissue |
| 1 micrometer (µm) | 1,000 nanometers (nm) | Bacteria, organelles |
| 1 nanometer (nm) | 0.001 micrometer (µm) | Viruses, molecules |
📊 Summary Table
| Step | Action | Notes |
|---|---|---|
| Place stage micrometer | Focus on known scale | Slide with precise divisions |
| Align eyepiece graticule | View both scales superimposed | Both scales must be visible |
| Count divisions | Measure eyepiece units vs stage scale | Example: 50 EPU = 0.5 mm |
| Calculate size of 1 EPU | Stage length ÷ number of EPUs | Gives length per eyepiece unit |
| Measure specimen | Count specimen EPUs × size of 1 EPU | Gives actual specimen size |
Calibration must be done for each objective lens (magnification).
Always keep units consistent when calculating or reporting measurements.
Eyepiece graticule alone does not give measurements — it must be calibrated with a stage micrometer first.