AP Physics 2- 10.3 Electric Fields- Exam Style questions - FRQs- New Syllabus
Electric Fields AP Physics 2 FRQ
Unit 10: Electric Force, Field, and Potential
Weightage : 15–18%
Question

• Draw another bar to represent the electric potential energy \( U_{f1} \) of the system consisting of all three particles when the third particle with positive charge is held in place at the bottom-right vertex.

• Draw another bar to represent the electric potential energy \( U_{f2} \) of the system consisting of all three particles when the particle with negative charge is held at the bottom-right vertex.

Most-appropriate topic codes (AP Physics 2):
• Topic \( 10.4 \) — Electric Potential Energy (Part \( \mathrm{(b)} \))
• Topic \( 10.5 \) — Electric Potential (Part \( \mathrm{(a)} \))
▶️ Answer/Explanation
(a)
Student \( Y \) is incorrect. Electric field is a vector, so both magnitude and direction matter. At Point \( P \), the fields from charges \( A \) and \( B \) add as vectors. A positive charge placed at the bottom-right vertex produces a field at \( P \) directed up and to the left. To make the net field zero, this third field must exactly cancel the resultant field from \( A \) and \( B \). The correct third charge is \( +Q \), not \( +2Q \). Thus, Student \( Y \) should say that a charge \( +Q \) would make the electric field zero at \( P \). Student \( Z \) is also incorrect. Electric potential is a scalar, so the contributions simply add algebraically. Because \( P \) is equidistant from all three vertices, the potential at \( P \) is proportional to the total charge at the vertices. Since the first two charges give \( +Q + +Q = +2Q \), the third charge must be \( -2Q \), not \( -Q \), to make the total potential zero. So Student \( Z \) should say that a charge \( -2Q \) is required.
A quick check is: \( V_P \propto \dfrac{Q+Q+q_3}{r} \). Setting \( V_P=0 \) gives \( q_3=-2Q \).
(b)(i)
In Scenario \( 1 \), the third charge is \( +Q \). Initially, when the third charge is very far away, the system has only one interaction, between \( A \) and \( B \), so the given bar is \( U_{i1} \).
When the third \( +Q \) is brought in, two more positive interaction terms are added, one with \( A \) and one with \( B \). Since all separations are \( d \), these two added terms are equal in size to the original one.
Therefore, \( W_1 \) is positive and equal to \( 2U_{i1} \), and \( U_{f1} = U_{i1}+W_1 = 3U_{i1} \).
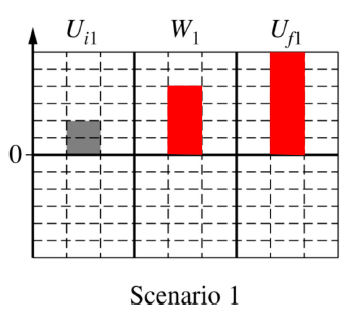
In symbols, if \( U_{i1}=\dfrac{kQ^2}{d} \), then \( W_1=2\dfrac{kQ^2}{d} \) and \( U_{f1}=3\dfrac{kQ^2}{d} \).
(b)(ii)
In Scenario \( 2 \), the third charge is \( -Q \). The initial bar is again \( U_{i2} \), coming only from the interaction between \( A \) and \( B \).
Bringing in \( -Q \) creates two negative interaction terms, one with \( A \) and one with \( B \). Each has the same magnitude as the original positive interaction, so together they contribute \( -2U_{i2} \).
Thus, \( W_2=-2U_{i2} \), and \( U_{f2}=U_{i2}+W_2=-U_{i2} \).
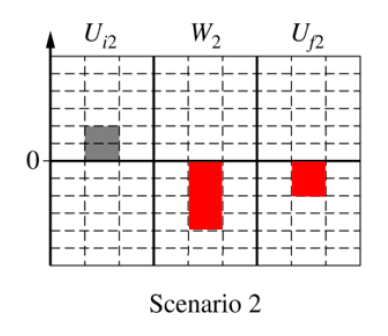
In symbols, if \( U_{i2}=\dfrac{kQ^2}{d} \), then \( W_2=-2\dfrac{kQ^2}{d} \) and \( U_{f2}=-\dfrac{kQ^2}{d} \).
The energy-bar idea is just \( U_i + W = U_f \). That is why the final bar is higher in Scenario \( 1 \) and below zero in Scenario \( 2 \).