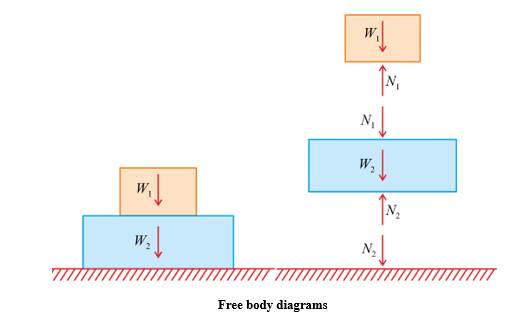
Free-Body Force Diagrams
A free-body force diagram (FBD) is a simplified drawing showing all the forces acting on a single object, isolated from its surroundings. The diagram helps analyse motion, equilibrium, and forces on both particles and extended rigid bodies.
What Is a Free-Body Diagram?
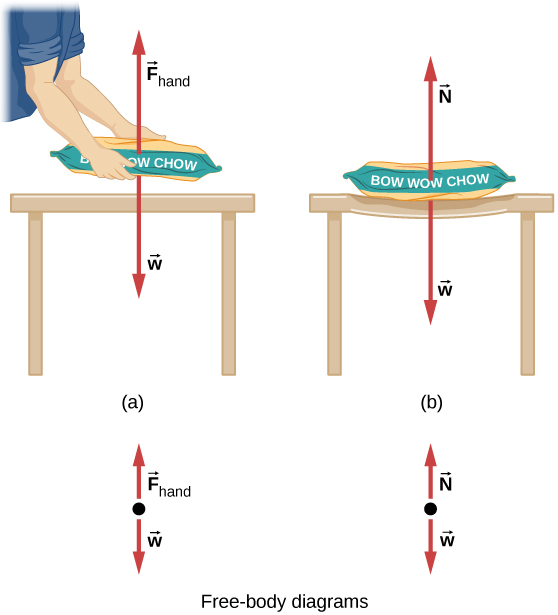
- A diagram showing an object separated from everything else.
- Only the forces acting on the object are shown.
- Each force is represented by an arrow starting from the object.
- The arrow’s direction shows the direction of the force.
- The length of the arrow represents the magnitude (if drawn to scale).
The purpose: To identify all forces clearly so they can be used in equations such as \( \mathrm{\sum F = ma} \).
Rules for Drawing Free-Body Diagrams
- Draw the object as a point (particle) or simple shape (rigid body).
- Represent each force with an arrow.
- Label each arrow with the type of force.
- Do NOT include forces the object exerts on other objects → only forces acting *on* it.
- Use the centre of gravity when drawing gravity on extended bodies.
Common Forces in FBDs

- Weight \( \mathrm{W} \) → acts vertically downward through centre of gravity \( \mathrm{W = mg} \)
- Normal reaction \( \mathrm{N} \) → perpendicular to the surface
- Tension \( \mathrm{T} \) → along a rope/string
- Friction \( \mathrm{f} \) → opposite the direction of motion or impending motion
- Applied forces → pushes or pulls
- Air resistance/drag \( \mathrm{D} \) → opposite motion
- Upthrust → acts upward in fluids
Free-Body Diagrams for Particles
A particle is treated as a point mass.
Steps:
- Draw a dot for the object.
- Add arrows outward from the dot for each force.
- Label each force (e.g., \( \mathrm{W} \), \( \mathrm{N} \), \( \mathrm{T} \), \( \mathrm{f} \)).
- Use these to write equations of motion.
Free-Body Diagrams for Rigid Bodies
A rigid body has size and shape, so forces may act at different points.

Key additional ideas:
- Weight acts at the centre of gravity (CoG).
- Multiple forces can act at different points.
- Turning effects (moments) must be considered.
- An extended body may rotate if there is a resultant moment.
Example: A ladder leaning against a wall
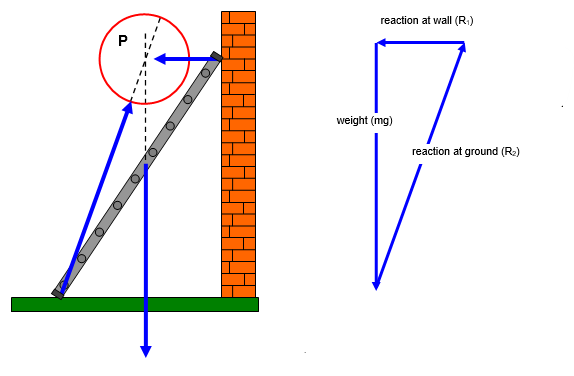
- Normal reaction at wall acts horizontally.
- Normal reaction at ground acts vertically.
- Friction may act at either wall or ground depending on motion tendency.
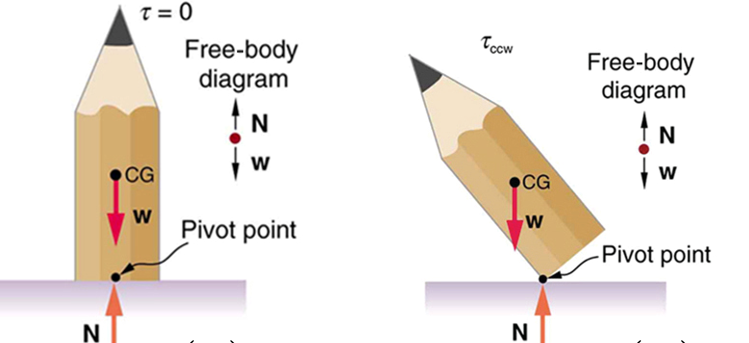
Centre of Gravity (CoG) in FBDs
Centre of gravity: the point where the entire weight of the body can be considered to act.
- For a uniform rod → centre is at the midpoint.
- For irregular bodies → depends on shape.
- Weight arrow must always originate at the CoG when drawing FBDs for extended bodies.
- If CoG is not directly over the base, the body may topple.
Using FBDs in Calculations
- Resolve forces horizontally and vertically.
- Use \( \mathrm{\sum F_x = m a_x} \) and \( \mathrm{\sum F_y = m a_y} \).
- For rigid bodies, also consider moments: \( \mathrm{\sum M = 0} \) in equilibrium.
- If forces balance → object in equilibrium.
- If resultant force ≠ 0 → object accelerates.
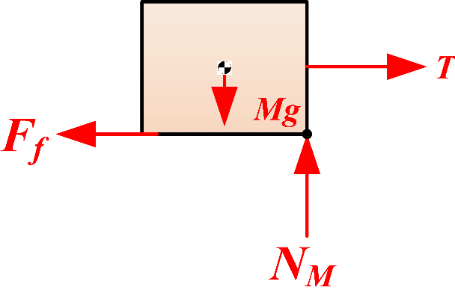
Typical Situations
- Block on an incline (weight splits into components).
- Object on rough surface (friction present).
- Suspended object in equilibrium (tensions in strings).
- Ladder against wall (multiple reaction forces + friction).
- Beam supported at two points.
Example (Easy)
Draw the forces acting on a block resting on a horizontal surface.
▶️ Answer / Explanation
Forces:
- Weight \( \mathrm{W} \) acting downward.
- Normal reaction \( \mathrm{N} \) acting upward.
Diagram:

Example (Medium)
A block is pulled across a rough horizontal surface by a rope making an angle of \( \mathrm{25^\circ} \) above the horizontal. Draw and label all forces acting on the block.
▶️ Answer / Explanation
Forces:
- Weight \( \mathrm{W} \) downward.
- Normal reaction \( \mathrm{N} \) upward.
- Tension \( \mathrm{T} \) at \( \mathrm{25^\circ} \) above horizontal.
- Friction \( \mathrm{f} \) opposite motion.
Diagram:
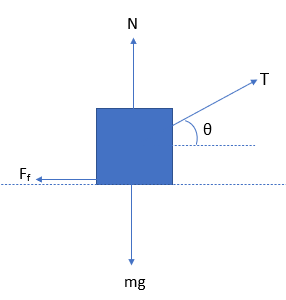
This FBD can be used to resolve tension into horizontal and vertical components.
Example (Hard)
A uniform rod of length 3 m rests against a smooth vertical wall and a rough floor. Draw the FBD and identify all forces acting on the rod.
▶️ Answer / Explanation
Forces acting on the rod:
- Weight \( \mathrm{W} \) acting downward at the centre of gravity (midpoint of rod).
- Normal reaction at wall \( \mathrm{R_w} \) acting horizontally.
- Normal reaction at floor \( \mathrm{R_f} \) acting vertically upward.
- Friction at floor \( \mathrm{f} \) acting horizontally (towards wall) to prevent slipping.
Diagram:
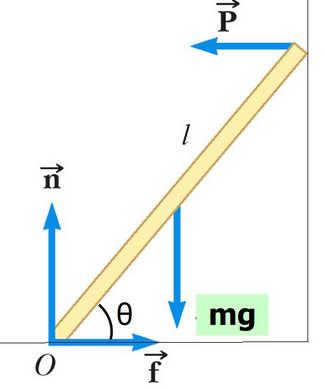
This FBD allows solving for equilibrium using: \( \mathrm{\sum F_x = 0} \), \( \mathrm{\sum F_y = 0} \), and \( \mathrm{\sum M = 0} \).