CORE PRACTICAL 7: Determining the Electrical Resistivity of a Material
This practical determines the resistivity \( \rho \) of a wire using measurements of its resistance, length, and cross-sectional area. The key equation is:
\( R = \rho\dfrac{l}{A} \)
Rearranged to find resistivity:
\( \rho = R\dfrac{A}{l} \)
Apparatus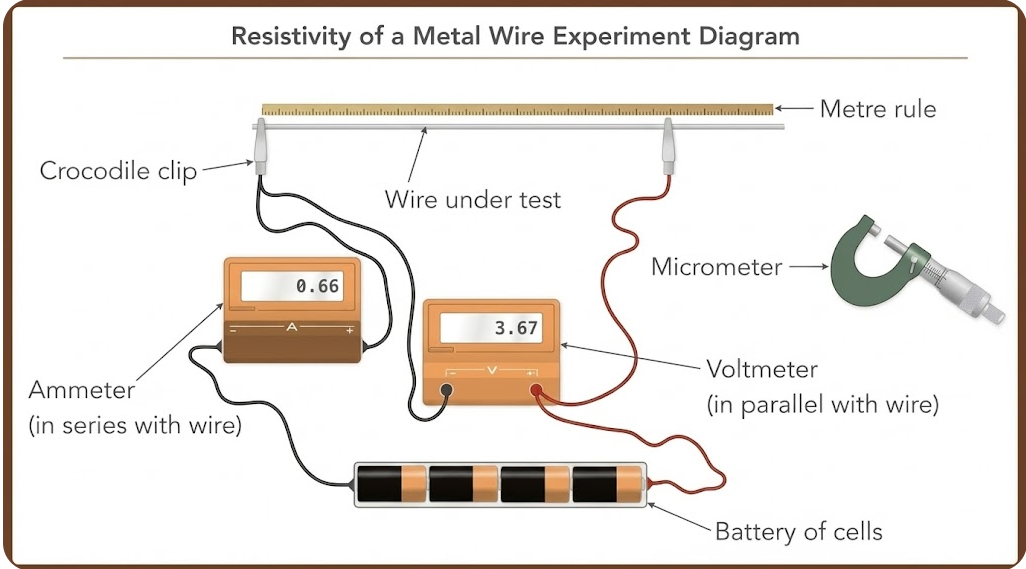
- Test wire of known material
- Metre ruler
- Micrometer screw gauge (for diameter)
- Ammeter (A)
- Voltmeter (V)
- Power supply (low voltage)
- Switch
- Crocodile clips
- Connecting leads
Method
- Measure the wire’s diameter at several points using a micrometer to account for irregularities.
- Calculate the average diameter and then calculate cross-sectional area:
\( A = \dfrac{\pi d^{2}}{4} \)
- Attach the wire to a metre ruler and connect it into a circuit with voltmeter across the test length.
- Set a known length \( l \) (e.g., 20 cm, 40 cm, 60 cm…)
- Switch on the power briefly and record the voltage \( V \) and current \( I \).
- Calculate resistance using:
\( R = \dfrac{V}{I} \)
- Repeat for several lengths \( l \) of the wire.
- Plot a graph of \( R \) (y-axis) against \( l \) (x-axis).
- The gradient of the line is:
\( \text{gradient} = \dfrac{R}{l} = \dfrac{\rho}{A} \)
- Multiply gradient by \( A \) to obtain resistivity:
\( \rho = \text{gradient} \times A \)
Why a Graph is Used
- Reduces random error from single measurements.
- Allows identification of anomalies.
- Gradient gives a more reliable value of \( \rho \).
Safety Considerations
- Use a low voltage supply to avoid overheating the wire.
- Switch on for short periods only (minimises temperature rise → avoids resistance changes).
- Handle micrometer carefully to avoid damaging the wire.
Sources of Error & How to Reduce Them
- Wire not uniform thickness: measure diameter in several places and average.
- Poor contact resistance: ensure crocodile clips grip firmly.
- Heating of wire: use low voltage, short measurements.
- Length measurement error: ensure wire is straight AND ruler aligned properly.
Conclusion
- This practical allows accurate determination of material resistivity.
- Graphical method improves reliability.
- Careful measurement of diameter is crucial.
Example Calculation
You measure:
- Average diameter: \( d = 0.50\ \mathrm{mm} = 0.00050\ \mathrm{m} \)
- Length: \( l = 0.80\ \mathrm{m} \)
- Voltage across wire: \( 1.20\ \mathrm{V} \)
- Current through wire: \( 0.50\ \mathrm{A} \)
▶️ Answer / Explanation
Step 1: Calculate area
\( A = \dfrac{\pi d^{2}}{4} = \dfrac{\pi (0.00050)^{2}}{4} = 1.96\times10^{-7}\ \mathrm{m^{2}} \)
Step 2: Calculate resistance
\( R = \dfrac{V}{I} = \dfrac{1.20}{0.50} = 2.40\ \Omega \)
Step 3: Calculate resistivity
\( \rho = R\dfrac{A}{l} = 2.40 \cdot \dfrac{1.96\times10^{-7}}{0.80} \)
\( \rho = 5.88\times10^{-7}\ \Omega\mathrm{m} \)